Monday, July 23, 2007

The View From Up Here.....


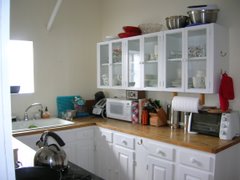
Sometimes I think the best feature of my kitchen is the view. If Edward Hopper were alive, and a had a ridiculous quantity of extra cash lying around, I would commission him to paint a painting of it -- enlarged to fit over the bed or a mantle.

Other times, I think the best feature of my kitchen is my husband! Sunday morning I realized that we had neither liquid milk nor eggs, so breakfast was looking like a challenge. But my hubby is the King of Pancakes, and undaunted by the lack of eggs forged ahead, making these delicious peanut butter chocolate chip pancakes:

Peanut Butter Chocolate Chip Pancakes

Using a baking mix that calls for eggs and water or milk:

1 3/4 c. pancake mix
1 T. cinnamon (optional, but a good addition...trust me!)
1 c. water
1 t. vanilla
1/4 c. peanut butter
3/4 c. chocolate chips

Using a fork, mix together the pancake mix and cinnamon. Stir in the water and vanilla. Fold in the peanut butter, incorporating completely, and then fold in the chocolate chips. On a preheated griddle, ladle on batter to form 4 inch circles. Using a spatula, push chocolate chips to disperse evenly throughout the pancakes. Turn when bubbles pop but stay open.

Serve with maple or chocolate syrup!

Makes 8-10 4-inch pancakes.

Friday, July 20, 2007

Honey, What's For Dinner?


For dinner Friday, I whipped together a super simple baked honey mustard chicken. It's so easy to get into a barbecue sauce rut with chicken, and we'd recently had stir fry, so it was time for a little something different.

Zeke the cat was enthralled with today's offering. It just smells good from the oven to the table. All you need is a chicken breast, honey, prepared mustard of any sort (I recommmend jalapeno mustard if you can find it!), salt, and pepper.

Quick and Easy Honey Mustard Chicken

For each boneless, skinless, chicken breast:

2 teaspoons of honey
2 teaspoons of mustard
Salt and Pepper to taste

Preheat oven to 350. Line a cookie sheet with foil. Trim visible fat from chicken. Drizzle honey and then mustard over the chicken breasts, sprinkle with salt and pepper. Use a butter knife to smooth the honey and mustard over the surface of the chicken. Place on the cookie sheet, and bake for 25 minutes if making up to 4 pieces, adjusting time upward as necessary if making more.

So simple....

Friday, July 13, 2007

Faux Pas!

So I don't have a picture of the final product of this recipe...my apologies. However I do have the nutrition analysis thanks to a friend, so hopefully that will paint a pretty enough picture of this delicious, rich, yet healthy cheese soup. Plus it's a bonus entry!

And even better than that, you don't have to stick to what I put into the soup. By making it with broccoli and cauliflower, and maybe chicken, your possibilities really go through the roof. So yes, you can eat healthy and have cheesy creamy soup!

I actually came up with this on Sunday night, after discovering the box of mac and cheese I'd planned to "doctor up" with some ham and peas had already been consumed....

Cheese Soup With Ham, Peas, and Potatoes

1 T Earth Balance spread (something with no trans-fats or sat-fats!)
1/4 yelllow onion (medium-sized)
1 T flour
3 c. skim milk
1 chicken boullion cube
4 oz. reduced fat cheddar cheese, shredded or in small crumbles
3 oz. lean cooked ham
1 cup frozen small peas
3 small potatoes or one large potato, baked or microwaved to soften, then cubed. (great for leftover baked potatoes)
Black Pepper to taste

IMPORTANT: Have all your ingredients measured and chopped before starting to cook. This recipe requires constant stirring and attention to temperature.

In a 2-quart saucepan, melt the spread and sautee the onion until clear. Reduce the heat to medium-low. Sprinkle flour in, and mix with the butter. Steadily whisk in the milk, incorporating the butter and flour. Add the boullion cube. Maintain the mixture just steaming but below a simmer. You may have to turn your stove to low. Simmering will "break" or curdle the soup.

Slowly add the cheese, about 1/2 an ounce at a time, continuing to whisk to incorporate. Allow the cheese to melt completely before adding more.

Add the potato and peas, allow soup to come back to steaming. Add ham, allow soup to just steam again, season with pepper (the cheese and ham will probably add enough salt.)

Serve immediately! Makes 3 1 1/2 cup servings.

Nutrition Information:

283 calories
7g fat (2g saturated, 4g mono, 1g poly)
19g cholesterol
804mg sodium
964mg potassium
33g carbohydrates
3g fiber
21g protein

If you break your cheese soup:

Remove all meat and veggies from your soup and set aside. In another saucepan, bring 1 cup of milk to steaming. Whisk in your existing broth a little at a time. Add back your meat and veggies. That should do the trick. You may want to add another ounce of cheese to regain the flavor, but then you'd also be upping your servings or portion sizes. 1 ounce reduced fat cheddar and 1 cup of skim milk adds 160 calories and 6 grams of fat to the recipe as a whole.

Wednesday, July 11, 2007

Birthday Cake!


Tomorrow's my husband's birthday -- his first married birthday to boot. Last year, I developed a special cake recipe just for him, incorporating all of his favorite flavors: spice, strawberry,and white chocolate, into something inspired by the local favorite, Boston Cream Pie. This year, recalling the obscene amount of cake the two of us tried to eat last July, and now having friends to share his birthday cake with, I opted for a cupcake version, and in the process, added some variety to the mix. You can try both, particularly if you enjoy a good spice cake! And yes, I use a mix.

The cake itself doesn't have a name, feel free to send in some suggestions!

Strawberry Spice Cake
Heat oven to 375

Cake:

1 White pudding cake mix
1 t. ground ginger
1 t. ground cinnamon
1/2 t. ground nutmeg
1/2 t. ground cloves
1/3 c. canola oil
4 egg whites

Grease and flour the bottoms of 2 9-inch round cake pans. Blend dry ingredients, then add oil and egg whites. Mix for 2 minutes on medium speed using an electric mixer, or 3 minutes by hand. Pour into pans. Bake according to package instructions until toothpick in center comes out clean. Turn out on racks, to cool thoroughly. Then wrap layers in plastic wrap and the foil, and freeze overnight.

Filling:

16 oz. frozen sliced strawberries with sugar, thawed.
1 T. cornstarch dissolved in 1 T. water

In a saucepan, over medium-low heat, warm strawberries. Blend in cornstarch solution. Keep mixture just below or at a bare simmer, stirring constantly until mixture thickens and clings to spoon, about 8 minutes. Set aside to cool to room temperature.

Frosting:

2 sticks (1/2 pound) unsalted butter, softened
12 oz. white chocolate, melted and cooled slightly
1 c. powdered sugar
1 t. pure vanilla extract

In a large bowl, using a handheld electric mixer, beat the butter at medium speed until creamy. Beat in the melted white chocolate. Add the confectioners' sugar and vanilla and beat at low speed, scraping the sides and bottom of the bowl, until light and fluffy. Keep at room temperature.

To assemble the cake, unwrap frozen cake layers. Place first layer flat-side down on a plate. Spread a thin layer of frosting on the top, and then using a pastry bag, or a sandwich bag from which you've trimmed off a corner, to pipe a 1/4 inch ring of frosting around the edge. Spread a 1/4 inch layer of strawberry filling in the middle, and place the top layer, round side down, on top. Frost cake with remaining buttercream, and garnish top with fresh strawberries.

Cake should be stored, loosely or tightly covered if not cut -- tightly covered if cut, in refrigerator. Beware of strong odors that may cross-contaminate the delicate frosting!

The cupcakes work similarly. Again, I started with a white cake mix made according to the yolk-free instructions, but this time I divided it in half, keeping half white cake, and adding 1/2 the spices listed above to the other half. Using Wilton white cupcake papers, I baked the cupcakes according to package instructions, and cooled them. Again, I made the filling, but this time I ran it through a blender to puree the bigger strawberry bits. Using a pastry bag and the rose petal tip, I pressed the tip of the bag into the top center of each cupcake, injecting enough filling that I just started to see a slight crack at the top, repeating for all cupcakes, and filling the white cakes first.

For frosting, I again opted for variety. I topped half of the white cupcakes with pre-made Sour Cream Chocolate frosting, and all remaining cupcakes with Cream Cheese Frosting.

Feel free to experiment with any number of fillings! The combinations are nearly endless....

Saturday, July 7, 2007

"If You Want a Nourishing Fish Dish..."


Today's title is a quote from one of the silliest songs I've ever enjoyed. It's called "Ahoy There!" by Mr. Scruff.

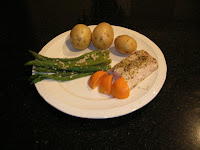
Fish's many health benefits have been touted over the years, and in many places, a greater variety of fish has become available in grocery stores. While choosing local seafood can result in fresher taste, not every locale has this option. Also, trying new types of fish keeps the menu fresh. Today's recipe features mahi mahi, however it may be made with trout or tilapia.

Mahi mahi has a firmer, more dense texture than trout, yet without the strong flavor of salmon or swordfish. This combination results in a fish that satisfies without being overwhelmingly "fishy". The seasoning you add here is the flavor you'll taste.

Citrus Mahi Mahi -- serves two
Oven at 450

1/2 lb. filet of mahi mahi, boneless and skinless
1 t. grated lemon zest
1 t. grated lime zest
1 t. onion powder
1 t. salt
1 t. black or white pepper
1 pat (roughly 1/2 tablespoon) butter or margarine.
1 T. Lime juice (or juice from two limes)
1 t. lemon juice
2 Clementines, cut into quarters

Place the mahi mahi on a foil-lined cookie sheet. In a small bowl, combine dry seasonings, and rub over the top of the filet, distributing evenly. Add more lemon or lime zest if needed. break apart the butter, and dot over filet evenly. Drizzle lime and lemon juice gently over the fish, not washing off the seasoning. Place in oven, and bake 15 minutes, checking for doneness at 10 minutes. The fish itself should not brown, just turn opaque, but the juices around the sides may brown on the foil. Remove from oven, squeeze two of the clementine quarters over the fish, serve garnished with remaining clementine wedges.

Pairing a substantial fish with a flavorful vegetable, such as asparagus, creates a memorable meal. Frozen asparagus speeds up the process, allowing for perfect timing of the main course and the side. Microwaving veggies to steam them helps to create fewer dirty dishes -- VERY important in a small space!

Quick Garlic Asparagus

5 oz. frozen asparagus spears
2 cloves of garlic, crushed
Salt and pepper to taste

In a large, microwave-safe bowl, toss together asparagus, garlic, salt, and pepper. Add 1/8 cup of water to bowl, and cover with paper towel. Microwave on high 5-7 minutes, rearranging asparagus occasionally. Because all microwaves are different, times aren't exact. The main goal is to have the asparagus be crisp-tender and heated through.

I recommend rounding out the meal with small baked potatoes served with salsa and fat-free sour cream.

Wednesday, July 4, 2007

Happy Independence Day!


As a government student living in the birthplace of the American Revolution, one might be inclined to think that I'd be spending the day reflecting on the actions of our forefathers in this city 231 years ago, and how that laid the foundation for our nation as we know it today. At least, I thought I would....but no. Friends are here, and time with friends calls for GOOD FOOD!

Said friends are from Kansas, so what better treat than a seafood-infused menu, including some make-ahead items:
Shrimp Cocktail
Crackers with chive-pineapple cheese and smoked salmon
Tortilla chips with salsa and guacamole
Assorted cookies (including remaining chocolate chip!)

The inspiration for the chive-pineapple cheese comes from several cheeseball recipes I've read. While I enjoy the flavor of cheeseballs, the consistency makes for awkward snacking. To facilitate the snacking-while-visiting, I've substituted whipped light cream cheese.

Chive-Pineapple Cheese

1/4 c. walnuts or pecans
16 oz. fresh pineapple plus 2 teaspoons sugar, or 8 oz. canned drained pineapple
8 oz. Whipped Light Cream Cheese
1/2 t. Tabasco
1/2 oz. fresh chives
1/2 c. Light Shredded 3-cheese blend or cheddar
Salt and Pepper to taste
4-6oz. Smoked Salmon

In a food processor or blender, pulse walnuts until ground, remove and set aside. If pineapple is not crushed, add to food processor and pulse until chunky. Add Cream Cheese and hot sauce, and pulse until mixed. Add chives, shredded cheese, salt, and pepper, and pulse until chives are chopped but not pureed. Fold in chopped nuts. Chill for at least 2 hours, or overnight, to allow flavors to mingle.

After the cheese has chilled, cut some smoked salmon into 2 by 1/2 inch rough rectangles. Spread a thin layer of the cheese on one side of the salmon, and roll up. Set one each on crackers. Save remaining cheese mixture to serve with a knife or spoon and untopped crackers.


When it comes to guacamole, the trend seems to be "the chunkier, the better". While that is a nice idea for sit-down meals, I don't like to worry about balancing delicate morsels of avocado and tomato on the point of a tortilla chip in a crowded setting. This recipe can go either way. So banish that seasoning packet, and follow this quick, easy recipe to fresh guacamole:

Party Guacamole

2 ripe avocados, peeled and pitted
2 plum tomatoes, stemmed and quartered
1-2 cloves of garlic, crushed
1 T. lime juice, or juice of two limes
1 t. lemon juice, or juice of 1/2 a lemon
Fresh Cilantro, salt, pepper, and cayenne, to taste

In a food processor, combine all ingredients. When well-blended and mostly smooth, you're done! For the chopped-style, simply chop the avocadoes and tomatoes into small cubes on a clean cutting board. Chop the cilantro. In a bowl, combine the juices, salt, and peppers. Add chopped avocadoes, tomatoes and cilantro to bowl. Cover with lid or plastic wrap, and toss gently to coat. Either way, allow to marinate in refrigerator for 1 hour prior to serving.

ETA: We went out to dinner, so I have no pics of "the spread"! We came back so full, that the snacks have become our lunches this week....oops!

Sunday, July 1, 2007

Welcome to My Kitchen!


You and I are entering at roughly the same time, as my husband and I just moved into our new digs -- all 700 square feet of 'em -- yesterday. This galley kitchen boasts adorable white cabinets, butcher block counters, no disposal, no dishwasher, and a 40-year-old 18 inch Hardwick/Robertshaw apartment range. Lucky me, right?

Fortunately, this dinosaur comes with low miles, as it appears that I am one of five people in all of Boston who ever cooks or bakes at home.

Getting started in any new-to-self rented kitchen can be hairy. The appliances never fit on the counter exactly as you imagined, the pots and pans suddenly forget how to nest, and immediately after signing the lease at least one funky quirk pops up -- ours being the fact that despite the appearance of under-sink storage, you can't open that (would-be huge, relatively speaking) cabinet.

Once you've got your shelves and drawers wiped and stocked, you've only come 1/3 of the way. The biggest question remains: What is the story with the stove? How does it perform? Any gremlins in there? Rarely does the landlord know, and few of us get the chance to talk with the previous tenant (in my case, he didn't bake anyhow). I've found that the best way to learn a new stove is to bake something familiar, both low-cost and low-effort, that will accurately display the heating pattern (does the back get hotter? the left side?), and temperature tendency. What better thing to bake then chocolate chip cookies?

Baking on a cookie sheet, particularly one that fills the majority of the oven, will show you where hot spots form, and choosing a relatively fast recipe prevents you from getting tired of monitoring the oven. At 9-11 minutes per round, I didn't feel compelled to run around the apartment settling other issues, and instead worked on becoming more familiar with where my stuff ended up. Also, baking a half batch does double duty as damage control (particularly if the oven doesn't heat at all) and portion control.

Besides, what else so easily makes a new apartment smell like home, than the fragrance of fresh-baked chocolate chip cookies?

Chocolate Chip Cookies -- Apartment-style
Preheat oven to 375

1 stick butter (flatter cookies) or margarine (poofier cookies), softened
3/4 c. brown sugar
1/2 t. vanilla
1 egg
1/2 t. baking soda
1/2 t. salt
1 1/8 c. flour
1/2 bag (about 1 cup) of your favorite chips

Using a fork, in a medium bowl, cream together the butter, sugar, vanilla and egg. Add soda and salt, and mix thoroughly. Gradually add in flour, scraping sides until fully incorporated. Then fold in the chocolate chips. Drop by rounded tablespoons onto ungreased cookie sheet. Bake 9-10 minutes, monitoring for doneness. Edges should be golden, but due to the high brown sugar content, these guys are a little more honey-colored than the usual anyway.
Remove from cookie sheet immediately and cool on wire racks. Yields 2 to 2 1/2 dozen cookies.

Enjoy!!

I was pleased to find that this little oven really does the job, only heating the back slightly more...but it shouldn't be a problem...